Selecting Point Features for Editing
As illustrated in the Getting Started topic, you can select records for editing in any of several different ways. For example, while exploring the map you can right-click a displayed symbol and select the topmost option from a pop-up context menu. Another way is to click a toolbar icon (white arrow with small rectangle) and left-drag a rectangle enclosing the points of interest. There's also a text search dialog (accessed via the binocular toolbar icon) where you can search attribute fields for text using a variety of options. Finally you can select multiple records by selecting rows in a table view and choosing either "Open as selected points" or "Add to selected points" from the table's context menu.
With all these methods, matching points are displayed in the Selected Points window where they can be individually examined. The names (labels) of selected points appear alphabetically in a tree diagram on the left side, their parent branches indicating the corresponding layers:
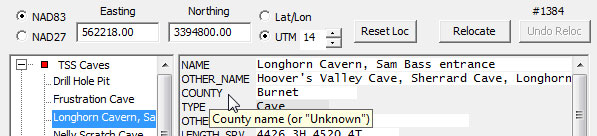
Here you can directly edit both the location and attribute fields of a feature highlighted in the tree. Only when you move away from a feature, say by selecting a different tree branch, are changes committed to files. Until then, the Reset Attr button (at bottom of window) and the Undo Reloc button (at top-right) let you undo any edits.
Like the Layers window, the Selected Points window is resizable and can stay open while you perform other operations, such as panning and zooming the map view. For example, when a feature is highlighted in this window you might want to change its location to a recognizable place on the map. You can do this by repositioning the view as necessary and right-clicking the map at the desired new location:
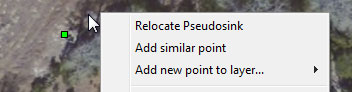
Besides point relocation, the pop-up menu offers the choice of creating a new point with attributes initialized to have the same values as the highlighted point. To create a new point with blank attribute values, highlight a root of the tree (the shapefile's title) before right-clicking on the map.
After adding or relocating a point visually, you may want to adjust the resulting location via the edit boxes at the top of the window. When you make changes in those boxes, however, you'll need to click the Relocate button for the changes to take effect. Note that as long as you stay positioned at a point, successive relocations can be undone in reverse sequence via the Undo Reloc button.
Instead of directly editing the individual coordinate fields, you'll often find it more efficient to transfer, with a single paste operation, a pair of coordinates copied from another source. This could from another shapefile record in the project, from the map view's Center on Point dialog, or directly from a web mapping application. (See examples.) The copy/paste options are selections in the right-click context menu for a highlighted tree item as shown below. In this example the Paste coordinates selection is disabled (grayed) because the program notices that the Windows clipboard doesn't contain what it would recognize as a valid coordinate pair. What it looks for and accepts are a variety of common formats used for a pair of geographical coordinates, including Lat/Long forms that aren't ordinarily displayed, such as as N 30° 25' 30.5", W 97 15' 2" or simply 30 25 30.5 -97 15 2.
Editing Memo Field Content
Both in the Selected Points window (as shown above) and in a table view, memo fields appear as pushbuttons followed, possibly, by a fragment of text representing the first portion of the memo's content. In the Selected Points right panel there is space for a single indicator just left of the button. It's either a tilde (~) indicating presence of a set of linked image files, an asterisk indicating a non-empty text memo, or a blank if the field is empty. If it's a tilde, left-clicking the button opens the image preview window. When there's no tilde, or if you right-click the button, the text editor window opens to display the field's content.
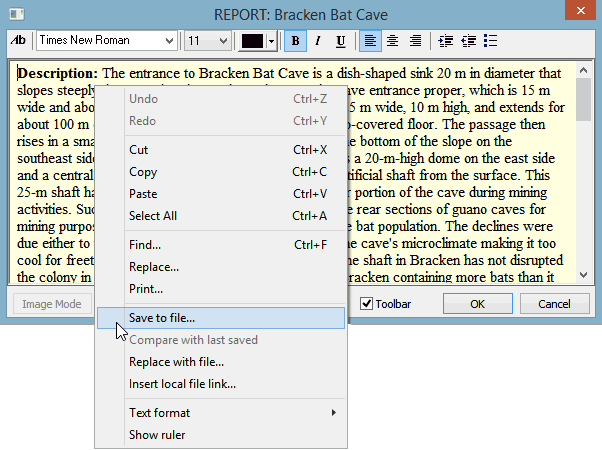
While relatively basic in capability, the editor does allow switching between plain text and rich text formats, the latter being compatible with programs like WordPad and Microsoft Word. It also has a Save to file function that creates a file with the appropriate extension -- either txt or rtf. The suggested output file name in the save dialog will be of the form "Texas Public Caves_#2_REPORT-Bracken Bat Cave.rtf." Note that the shapefile name, record number, field name, and record label is represented in this name, which of course you can change.
When a database has multiple contributors the maintainer might need to compare two different versions of a long report. The program currently doesn't support more than one open editor window, but for such comparisons this would be of limited value anyway. Instead we have the Compare with last saved function. When enabled it launches a compare/merge program with the contents of two memo fields displayed side-by-side: the current memo at left and the last saved memo at right. The launch operation involves the creation, without prompting, of a file to store the current memo using the above naming convention. The compare program (the specific one used being a preference setting) will then highlight any differences. It might also allow you to edit either side, in which case you can load the result into either memo field using the Replace with file option.
Options related to the editor, such as colors, type styles, and initial opening mode can be set in the Text Editor Preferences dialog accessed via the program's main menu (Preferences | Text editor preferences). That dialog contains a Text compare program: Options button that lets you specify which program, if any, is available for comparing memo text. The program used by default, if it's installed, is the open source WinMerge. For more details on this option, see Comparing Memo Field Text.
Creating an Image Memo
Finally, note the button labeled Image Mode at the editor window's lower left. It's enabled when an empty memo (or one that already contains image links) is first opened. Its purpose is to the replace the editor window with an empty Image Viewer window, one with an entirely different interface. From the Windows file manager you can drag and drop (or copy and paste) image files to this window. There are also context menu options for adding information such as titles and captions.
A memo with image links contains standard text, but it's formatted a special way, such that when the memo's button is left-clicked the thumbnail-style viewer will open instead of the editor. (If the text editor happens to be open with a different memo, it won't be affected.) To ascertain the simple format we use for image memos, right-click the memo's button to view or edit the text directly. Some types of changes, such as fixing a misspelled photographer's name, might be easier to perform while in editor mode using the search-and-replace function.
Editing Attributes in a Table View
Opening a table view of all or part of a shapefile makes in-place editing of field values possible. It's the only way, currently, to edit shapefiles that aren't of type 2D point. One must be careful with table edits, however, since it's easy to make changes that can't be undone. Unlike the Selected Points form, moving away from a cell will commit the change. For this reason, the table's window has a checkbox to enable editing. (If you find the checkbox disabled, you'll first need right-click the shapefile's title in the Layers window and select Allow editing this file.)
When browsing the attributes of a 2D point shapefile, you'll often find it convenient to select several rows, right-click on one of them, and choose either Open as Selected Point(s) or Add to Selected Points. You'll then be able to use the Selected Points dialog to modify the assigned coordinates. Any special attribute fields that may exist (coordinates, timestamps, etc.) will appear in both table and form views, but only as grayed text. Such fields are never directly edited.
Record Deletion vs. Removal
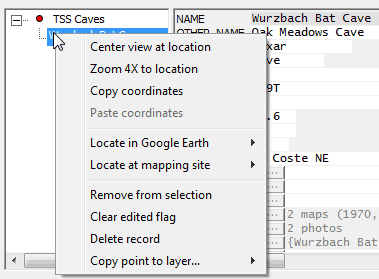
Note the "Delete record" option in the above context menu. It's also present in a table view's context menu. This operation flags the selected records in a standard way so that thereafter programs will ignore them. By default, WallsMap will skip deleted records when exporting shapefiles. In a table view it's possible to Reload the table content so that the deleted records are visible as rows with asterisk prefixes. Also, the menu option View | Select Edited features can open deleted points in the Selected Points window. Whenever deleted records are visible they can be selectively undeleted.
To remove a record from a database using the Compare with other layers function, one does not delete the record in the shapefile being edited. The convention this program has adopted for scheduling a removal is to simply edit the label field, inserting an asterisk (*) as the first character. Once the shapefile is received and processed by the primary database manager, the record will be gone from the master shapefile and its key permanently retired.
Transferring Coordinates from One Point to Another
A quick way to relocate a point to the position of another point is by right-clicking a tree item in the Selected Points window and choosing Copy coordinates or Paste coordinates from the pop-up menu. The copy operation, when creating text for the Windows clipboard, uses the format you've set for the location edit boxes, such as Lat/Long and NAD83. The paste operation simply inserts the clipboard's text into the edit boxes without regard for coordinate system and datum setting. The paste isn't allowed, however, if the program doesn't recognize the text as a pair of numbers. After a paste, you can either click the Relocate button to actually move the point and update the map view, or click the Reset Loc button to undo the paste.
Special Case: Testing Datum Assumptions
Using the coordinate copy/paste operation you can test for common datum errors with just a few mouse clicks. For example, if you suspect that a NAD27 UTM GPS reading was mistakenly assumed to be WGS84 (or equivalently NAD83) when it was stored in the shapefile, perform the following steps while the point is highlighted in the Selected Points window:
•Set the format for the location edit boxes to the questionable datum and associated coordinate type -- NAD83 and UTM in this example.
•Right-click the point's label in the window's left panel and select Copy coordinates.
•Change the datum setting for the edit boxes to the other possibility (NAD27) and perform a Paste coordinates operation.
•Click the Relocate button (knowing that you can undo the relocation).
As you click Relocate, examine the map view. If the feature's marker moves to a place you like better, you may have corrected a set of UTM coordinates for which WGS84 was wrongly assumed. In Central Texas the placemark will have shifted 205 meters north and 35 meters west. Here you're checking the possibility that UTM coordinates were tagged with the wrong datum. Perhaps surprisingly, the size of the location shift is different when testing a datum assigned to Lat/Long coordinates. For locations in Central Texas, changing a Lat/Long datum from NAD83 to NAD27 will shift the placemark 25 meters north and 30 meters west. Of course, with either coordinate type, correcting a mistaken NAD27 assumption will produce a shift in the opposite direction. When neither the original coordinate type or the "direction" of the suspected datum error is known, you may want to test all four possibilities while examining the map's imagery.