Whether georeferenced or not, any raster image the program can open can optionally be converted to an NTI file. This is basically a container for individually-compressed 256-pixel x 256-pixel tiles. When large image files are likely to remain as background layers in a GIS project, there's no reason not to perform this quick operation. Since the NTI format was designed for efficient caching and screen display at different zoom levels, you'll likely see a significant gain in speed.
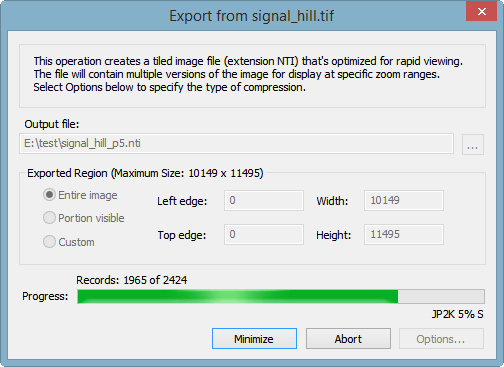
The NTI export dialog (shown above) is accessed by clicking the Export button in the Layers window whenever the image layer is highlighted. The dialog lets you specify a rectangle in the original image, one that defines the region to be exported. No rescaling will occur; you're simply choosing which pixels to be included. Here you can also modify the suggested output file pathname. When you're experimenting, you may want to add a suffix to the name to indicate which tile compression options were chosen. In this example, the option in effect is JPEG2000, with the degree of "lossiness" such that image data will be compressed to about 5% of its uncompressed size.
When the operation completes you'll see a report like the following:
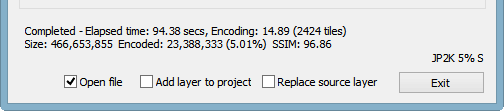
If you're interested in quickly comparing a lossy-compressed exported file with the source (or with other exported versions), check one of the two boxes labeled Open file and Add layer to project. The first choice allows a side-by-side comparison, with views optionally synchronized. The second choice, which is enabled only for georeferenced images, is to add the new file to the source file's layer set. This let's you see the effects of lossy compression by toggling visibility check boxes in the Layers window. If there's no need to compare, you can check a third box labeled Replace source layer. This will remove the source file from its layer set and insert the new file in its place. No disk file is deleted.
Compression Options
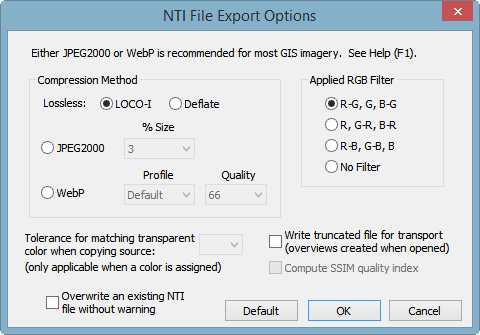
The Options button in the NTI Export dialog opens the dialog shown above. There are four compression methods to pick from. The two lossy ones are appropriate for most background imagery, where uncompressed data sizes can range from tens of megabytes to tens of gigabytes. By allowing some information to be discarded, we can usually compress data to 3-10% of its original size without there being a perceptible loss of image detail or quality. With a lossless method we can't expect much better than a 50% compression ratio. Since export operations and on-screen comparisons can be performed fairly quickly, one can experiment to find the best balance between space savings and quality.
WebP is a lossy image format recently introduced by Google. Unlike the default JPEG2000 option, for which you specify a target compressed data size, the WebP option accepts a "quality" specification between 20 and 100. (The 100 setting is not the same as lossless; the format actually has a lossless variety but it's not implemented here.) You can also pick one of six profile settings (Default, Picture, Photo, Drawing, Icon, and Text) that supposedly tailor the algorithm to the type of image. These are the same settings offered by Google's open source compression program, cwebp v0.3.1. When applying them to GIS files of various kinds, I haven't yet noticed a significant advantage in using profiles other than Default.
JPEG2000 offers size choices ranging between 1% and 50% of the uncompressed data. It also has a setting, labeled Best lossy, that instructs the compression algorithm to search for what it considers to be a good balance between quality (lack of image degradation) and size reduction. Most likely this setting will produce a larger file than what you would need for sufficient quality. Finally, at the bottom of the drop-down list, you'll see a Lossless setting. More often than not, I've found that option to be less effective than LOCO-I for tile compression.
LOCO-I is the best method I've found for compressing 256-pixel x 256-pixel tiles losslessly, especially if the source image is a 24-bit color photo. For drawings, or scanned topos, which usually have large areas of uniform color, the better-known Deflate (zip) method might perform better. Since both methods can benefit from the application of a simple transformation of the Red, Green, and Blue 8-bit color bands before they're acted upon, an Applied RGB Filter option is available (see above). The R-G, G, B-G choice usually works best in my experience.
Special Case of Paletted Image Files
Regardless of the chosen compression method, if the source image is paletted (colors stored as byte indexes into a 256-color palette), a full-resolution copy of it is stored in the NTI file using the lossless deflate method. Only the smaller-resolution copies (overviews) are compressed using the chosen method. This isn't the case with 24-bit RGB images, where both the full-resolution copy and the overviews are subject to lossy compression if that was the choice. This means that when you view converted USGS topographic map images, which are normally paletted, you'll see no image degradation at zoom levels greater than 50%. (At smaller zoom levels an overview is displayed.) Also, no image information is lost if you later decide to use the exported NTI as the source for a new NTI export, where possibly different compression settings are used to create the overviews.
SSIM Computation
With both the WebP and JPEG2000 options you can choose to compute a Structural Similarity (SSIM) index for the purpose of experimentation. The larger this number, the less image degradation (at least of a certain kind) will have been caused by lossy compression. The calculation of SSIM, which is based on a grayscale version of the image, is complex enough to quadruple the processing time, but thereafter the index will be available for display in the NTI file's Properties window. You can use it along with visual inspection to compare the effects of the various compression options.
Since SSIM is calculated only for the full-resolution portion of an NTI file (and only for whole tiles), the option is disabled for paletted images where only the overviews are lossy compressed. The option is also grayed out for the lossless methods, all of which would produce the largest possible SSIM value of 100.
Recommendations
My tests indicate that JPEG2000 is about 50% faster than WebP when compressing but somewhat slower than WebP when decompressing. While visual quality and SSIM values are comparable for similar-sized output, the compression artifacts are qualitatively different. For example, JPEG2000 can give a blurry or mottled effect to areas with near-uniform color, whereas WebP tends to smooth out variations that might, in some cases, be considered useful detail. These effects can favor either method over the other depending on the type of image and the degree of compression. Given what I've seen so far, I would recommend WebP for scanned line art, such as topos and drawings, and JPEG2000 for aerial photography.
Also see Generating NTI Files for Efficient Viewing in the Getting Started section.